Before you start to build a shed one of the key things you need to do is put down a solid foundation. This guide shows you how to best do this.
Overview: Whether you’re an active gardener, seasonal landscaper or just someone looking for a unique summer project, undertaking the construction of a garden shed will provide not only a fun, but memorable experience for all those involved.
While this project will require an investment of both time and money, it will leave any man, woman or child with a wonderful sense of accomplishment, not to mention a dynamic and useful structure. A shed can take on various forms, from a plain square shack of corrugated metal to an elaborate, ornamental A-frame building. The only limits are those that you set on yourself.
For those new to construction or uncomfortable buying their own supplies, know that there are prefabricated shed kits available. While restrictive in terms of customisation and generally more expensive, kits eliminate the headache of having to purchase, measure and cut your own materials. Whether from a kit or custom-built, your shed will consist of three main components: a walled frame, a roof and—most importantly—a foundation.
Foundations come in two basic forms: temporary or permanent. This guide will discuss the latter of these two variations—specifically focusing on the slab foundation.
At the most rudimentary level, think of a slab foundation as a single piece of thickly poured concrete uniformly shaped with a flat, level surface. Below ground, the pour will typically be thicker and deeper around the edges, giving the slab a strong footing on which to rest.
The slab foundation, though somewhat labour intensive, does not require a high-level of skill or experience to create, yet it offers a handsome look with long-term durability if done properly. Check out this cool video showing the basics.
Tools: Like any household or landscaping project, some basic tools will be absolutely necessary. Every builder should have to following handy:
- Measuring Tape
- Level
- Shovel
- Trowel
- Hammer
- All-weather nails
- Drill
- All-weather screws
- Gloves
- A large hoe
- A heavy steel (concrete) rake
- A spool Twine or string
Aside from those essentials, you will almost certainly need the following from the local hardware store:
- Portable cement mixer (usually available for rental)
- Wheelbarrow
- Wooden or steel support pegs*
- Ground-Contact framing lumber*
- Concrete*
- Gravel*
- Steel mesh or basic chicken-wire*
Note: The necessary amounts for Items marked with a *will be determined by the size and scope of the project.
Building a Shed Base: Getting Started
If this will be your first attempt at a garden shed, choose a basic square or rectangle for the shape. Not only will this simplify the laying of the foundation, but it will make general construction easier later on.
For those advanced builders—or those just plain curious—more unconventionally shaped sheds exist, but if you’re seriously considering a triangular or circular design, your skill and familiarity with construction should make this guide unnecessary.
With a general shape in mind, examine your property for an adequate construction site. The ideal space will consist of level, undisturbed and firm soil. Avoid land that doesn’t drain well. During the wet season, such ground can not only flood, but shift with increasing saturation.
For those with only unlevel or hilly building space, know that completely levelling your chosen site will be an additional step in the process so plan accordingly.
Once you know where you want to build, take care to mark the area. Pegs and string tend to work best for this, but is not necessarily required, just recommended. Chalk-lining or spray painting are also suitable options, so long as wet weather won’t damage the markings.
The area now marked off, check the future corners of your shed to ensure that you’ve measured out right angles. An easy way to do this is to measure the diagonals—if they are equal to each other, the corners are square.
Building a Shed Base: Site Preparation
Having already identified and outlined the site of your future shed, it’s time to break ground. Keeping the border pegs in place for reference, begin digging out the entire area somewhere between 3 and 4 inches. Make sure that the finished area is as close to level as possible.
At the border of the area marked off, continue removing soil to a depth of 10 to 12 inches, forming something akin to a trench all the way around. The width of this deeper portion need be no wider than a small shovelhead, about 6 inches. This trench will serve as the footing area for the shed.
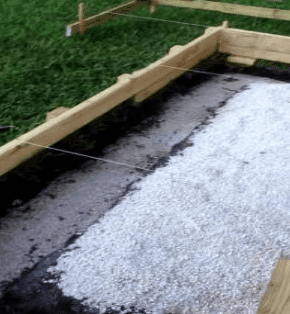
The bulk of the digging done, begin framing with boards cut-to-length—A veteran tip: wait to purchase the boards until all digging has been completed. Re-measure the site again for accuracy and then take those measurements to the hardware store or lumber yard. Have them cut the boards according to your measurements—it will save time and reduce stress.
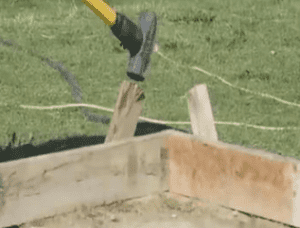
Secure the form boards in place with additional support pegs.
Feel free to screw the boards together at the joints, but it’s not usually necessary. Just make sure that the boards are level with each other and that no noticeable gaps appear.
Although tedious, securing the frame with pegs is an important step. Later on when pouring the concrete this extra measure of caution will not only ensure that your boards don’t warp or bow, but it will keep concrete from leaking out during the curing process.
Building a Shed Base: Basic Build
Begin by layering the entire foundation—including the footings—with 2 to 4 inches of basic gravel or crushed rock. Any decent hardware store should have at least a few material options to choose from.
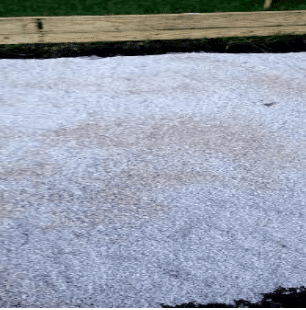
Once the gravel layer has been poured and re-leveled, strongly consider placing 1 or 2 layers of square steel mesh (or if it’s a small project, chicken wire) on top of the foundation area. Though it’s technically an optional component, the mesh helps to reinforce the concrete and prevent post-cure cracking and shifting. Sit the mesh up on broken pieces of cinder block or plastic chairs so that it will rest in the middle of the slab.
The good news is you’ll only need enough mesh to cover the central part of the foundation, leaving roughly 4 to 6 inches of space the between the border form and end of the mesh.
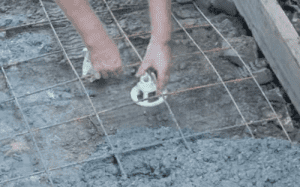
For those unsure about what type of mesh to use, talk to the professionals at your hardware store about the details of the project. Based on what you’re trying to do, they should be able to provide the best recommendation for strength and quantity.
Building a Shed Base: Pouring the Concrete
Rent a mixer or—if the shed plan is large enough—order ready mix concrete, which will be delivered to your property ready-to-pour from a truck.
Please note: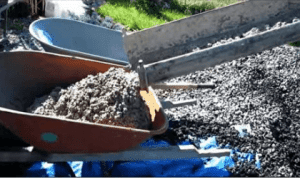
- Whether mixing it yourself or getting it delivered directly, make sure to put gloves on and wear clothes that can get ruined.
- Unless the shed is absolutely tiny, don’t use quick setting concrete. Just purchase ordinary concrete.
If a truck or mixer isn’t pouring concrete directly into your worksite, use a wheelbarrow to transport the concrete to the foundation frame.
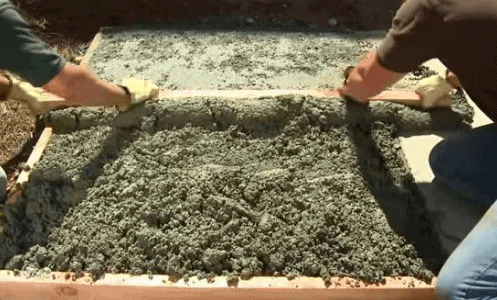
Once enough concrete has been poured, use a hoe/rake—and in tight spots, a trowel—to distribute it evenly, taking care to ensure the creation of a flat, smooth surface.
A piece of timber will help the tampering process. Reuse the trowel to smooth out any rough patches or lumps
Also, if the future construction plan requires anchor bolts for the walls, set them into the concrete now while it’s malleable. Concrete will usually begin to set in about two or three hours, so make sure that you’ll have an uninterrupted window to work once the mixing and pouring has begun.
Give the concrete 24-72 hours to cure completely before removing the forms. A pry or crowbar generally helps expedite this process. Once the forms are off, step back and admire your handiwork. You’ve just poured the ground-floor of your future shed!
This is great, thanks for the advice, it really helped me with the construction of the base for my BillyOh shed. The photos were great too. There’s also another guide here that I used for how to build a shed base: https://www.gardenbuildingsdirect.co.uk/blog/build-a-shed-base/
Scores
Thanks for the tip Paul. Glad it was of help.
Scores
Thanks for this, really useful. I wasn’t sure whether to go for concrete or paving slabs – I’d read this article which suggested a few different foundations types: gardenlifelogcabins.co.uk/blog/best-foundations-summer-house-log-cabin. After reading the post above and actually seeing the process and technique I went for concrete.
Scores
Could you tell me what concrete mix is the best for a base for greenhouse
Regards Dennis.
5 star.
Scores
Hi Dennis, the following should help.
A good concrete mixture is a ratio of 1 part cement, 3 parts sand, and 3 parts aggregate will produce a concrete mix that is ideal for a greenhouse. Accurate concrete mixing ratios can be achieved by measuring the dry materials using buckets.
When mixing the water with the cement, sand, and stone will form a paste that will bind the materials together until the mix hardens. The strength properties of the concrete are inversely proportional to the water/cement ratio. So this means the more water you use to mix the concrete the weaker the concrete mix. The less water you use to mix the concrete the stronger the concrete mix. Remember you can always pour in more water later so its best to add this slowly.
Its always useful to place a damp-proof membrane out before placing the concrete. There are numerous membranes available to suit a variety of requirements. The ‘visqueen’ or PIFA 1200 are off-the-shelf products that are commonly used throughout the construction industry. The main reason for using a damp-proof membrane prevents the newly poured concrete from drying out too quickly (de-watering) because of water absorption by the sub-base or sub-grade, which will adversely affect finished strength and can cause hundreds of tiny surface cracks.
Hope this helps.
Scores
Many thanks for the information you have put on whatshed I think you have covered just about everything in your reply and it is very helpful to me .
Regards Dennis
Scores
Thanks Dennis. I hope your build goes well.
Scores
Great guide by the way.
I read a lot about keeping the base level or screws may not align with holes etc when building a shed in-situe on the base.
How does this work with a fall to allow rain to run off if the base is minimally oversized? Should one allow a fall, if so how much? Or is it not necessary?
Scores
I forgot to add to my question above, what boards do you recommend for framing? What thickness, height etc.
5 *
Scores
I think it all depends on the size of the shed. Personally what I would do is go to your local timber merchant and just get a feel for the sort of thickness you feel would be best suited. This way you will get a good feel for it.
In relation to what sort of of wood you would want to use when building the shed I would suggest looking at out guide on that explains the types of wood to use when building or buying a shed.
We hope that helps.
Scores
Hi Danny, thanks for the nice comments on the guide.
You might want to check out our How to Build a Shed Guide for a few more tips and pictures on putting a base down.
Ideally you want the base to be higher than the surrounding ground so that you get no water settling in the shed. We would also suggest that you can also put down some wooden supports that the shed can sit on top of, this way the structure is always above the ground level.
We hope that helps.
Scores
Thanks for the article. I actually already have an old concrete base in the garden that I want to build a new shed and greenhouse on. The base is not level in all places, only slightly uneven though. It also has a few cracks in places. Should I pour concrete over the existing base to level it out or am I better off building a level wooden base on top of the existing concrete one?
Scores
Hi Sara, I think in your case either option would be OK.
Scores
Having completed the base and timber structure, I would appreciate some guidance in regards to the roof. Specifically, I’ve been considering a sheet like those at roofingmegastore.co.uk/building-types/sheds/shed-sheets.html This is primarily due to ease of fitting, but I would love to use tiles. Have any of you used tiles and is it really as tough as some say?
Scores
The key is to make sure your building has a strong structure and strong enough roofing timbers. I think either option would be good, personally I would go with whatever is going to give you the best end look.
Scores
Hi, I’m getting conflicting advice from builders /garden landscapers whether to go for a concrete base or gravel with pro base plastic grid for my garden cabin. My site has a dip that would need leveling. I’m on a tight budget. Any unbiased advice would be great. Thanks.
Scores